Doily Stenciled and Stained Desk

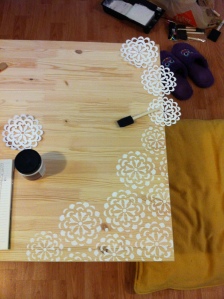
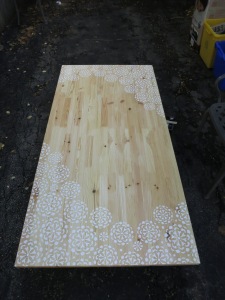
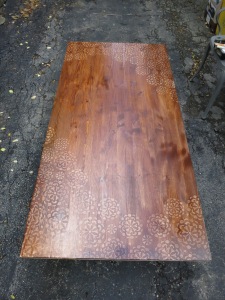
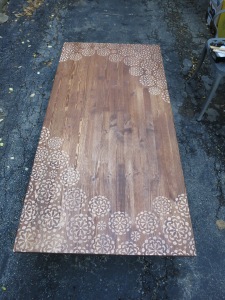
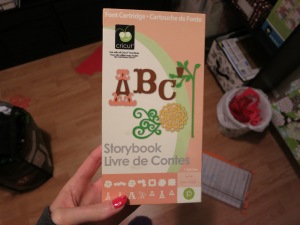
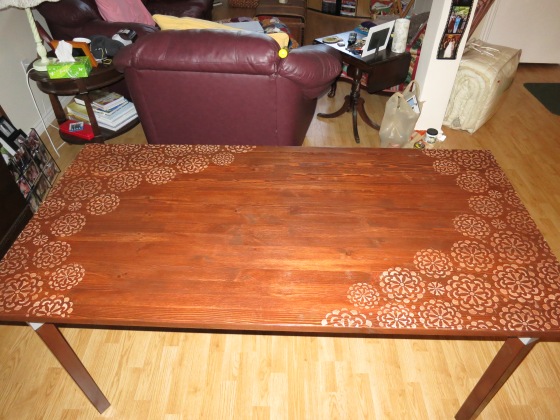
This DIY was a labour of love for about 3 months! When I moved into my new place I couldn’t take my old desk because it was too big. I had seen a post on Pinterest – Paisley Stenciled Table – that I had fallen in love with and knew I wanted to find a way to make it happen for my new desk. There was some trial and error with it but in the end I love how it turned out. I looked into buying a similar stencil but they are pricey! So I found another way to make it happen. I own a Cricut, so I started looking through my cartridges to see if I had anything suitable to use for a stencil. I found a cute “doily” like cutout that I thought would work. Below is my final product. I love it! It was a lot of work but totally worth it!

Stenciled Desk

I chose not to do an all over pattern on the table because I thought it would be too overwhelming with the small stencils I was using. Here are the steps and materials involved:

Materials Needed:
– a table (I bought a pine table top and legs from Ikea. I had looked into getting a table second hand but couldn’t find one that would work for this DIY.)
– white paint (I didn’t need very much so I bought a Behr interior/exterior paint sample size at Home Depot)
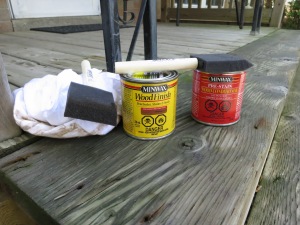
– pre-stain treatment for the wood
– wood stain in the colour of your choice
– foam brushes (1 and 2 inch sizes)
– cotton cloth
– sand paper and sander

Step 1

You will need to start by sanding the table and legs. At first I had thought I could sand it by hand, I quickly realized that would take FOREVER, so I moved to plan b. I borrowed an electric sander from my grandfather and also got some help from Leanne with her heavy duty sander! Its important to have a smooth surface when you apply the stain. Don’t forget to sand the legs as well. (I didn’t and learned the hard way that I should have.)

Step 2

Cut out your stencils. I knew I wouldn’t do an all over pattern on the table because it is such a large table but I knew I wanted a mirror effect from one side to the other. So I cut out my stencils in 5 sizes so that I had some variety. I used 5.5″, 5″, 4.5″, 4″ and 3″.
cricut cartridge
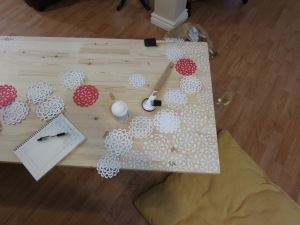
I laid out my stencils as I went to figure out the pattern I wanted. I used a 1″ foam brush to apply the paint and used a daubing technique to get in all the holes on the stencil. This definitely requires patience! It helps that I am a perfectionist so this tedious step was right up my alley.

step one

Yes that is a glass of wine in the photo on the floor. 😉 I often have a glass of wine while I am crafting! You can see I used alot of stencils. Even though I used the heaviest card stock I have I still found I needed to cut new stencils often. The paint got caked on the stencils pretty thick and it made it harder to use the stencil. I also made a map as I went (that’s what the notebook in the photo was for). I wanted to make sure I could mirror the exact pattern on the opposite side of the table. Tip: use only white paper for the stencils when applying the paint. I used the red ones just for placement value of the pattern.

stenciling

Step 3

Take your table outside or into a garage if you have one, to start the staining process. You need good ventilation for staining. First you will need to apply a coat of the pre-stain treatment (red can). Read the can for proper directions. If I remember correctly – apply with foam brush, wipe lightly with cotton cloth and let it dry for about 15-20 mins.

stain materials

pre-stain

Step 4

First coat of stainFirst coat dried

Apply the stain. I did 3 coats and stopped because I was happy with the look. You many want it darker, it will all depend on the colour stain you buy and the look you want. I used a 2″ foam brush to apply the stain. I would do one whole coat and then go back to the beginning and start to wipe the stain with the cotton cloth. The photo on the left was taken after I had applied the first coat. The photo on the right is after the first coat had dried. I took these photos to show how different it looks after it dries. This is why you need more than one coat.

Step 5

Last step will be to apply a few coats of polyurethane or varathane. This helps to seal the stain and protect the wood. I knew this desk would be used daily so I wanted to make sure it was well protected. I applied 4 coats to the top. Between each coat you will need to do a very light sanding to make it smooth. And I mean LIGHT sand, a very gentle swipe and that’s it. On the bottom of the table top and the legs I only did one coat because I knew they would be ok with less. I allowed the varathane to dry 24 hours between coats. (Not because you have to but because I had to due to my work schedule.)

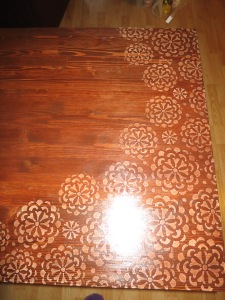
Here is a close up of the pattern:

doily pattern

I learned alot in this project! I thought I’d share a few of my trials and tribulations with this DIY…

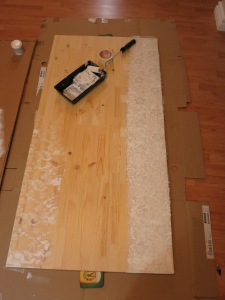
1. My original plan was to use a piece of lace and use a paint roller over top and have this beautiful lace pattern show up on the wood. Well it didn’t work at all! It looked awful. That was when Leanne came in and saved the day with her heavy duty sander and got rid of my mistake. Here is the evidence of my “craft fail”… it’s hard to see but I assure you it looked bad and nothing like lace! Leanne and I even tried using a spray can over the lace and that didn’t work either.
craft fail!

2. This is definitely easier to do if you have a garage! I do not have one, so I was propping up the table top on tupperware containers outside in my driveway to do the staining. This is okay as long as you have nice weather. I started this project at the end of summer into the beginning of fall. So this is what caused my biggest delay in getting this done. It also didn’t help that I got sick and it rained for a few weeks. I finally took the table over to my grandparents and used my Grandad’s garage.
3. I wish I could have found a good second hand table like the one that had inspired this DIY but alas I couldn’t. I ended up having to wait about a month to get the pine legs from Ikea because they didn’t have them in stock! Just another delay in this project. By this point I was so frustrated, I gave in to the fact that this table was going to be the longest DIY I had done yet.

I may have had alot of set backs with this project but in the end I am very happy with the outcome. I love my desk! And I can proudly say it is an original. 🙂

~Made beautifully by Heather~
Kid’s Playroom Painted Shelves

I recently converted a room from a home office to a kid’s playroom. The walls went from milk chocolate to white. Yes… white. In the past, I’ve always done kid’s bedrooms and playrooms in some bright colour, but I find inevitably I grow tired of that one bright colour throughout… especially when you add all of the other crazy colours, toys, accessories, etc. So this time around, I decided that white was a nice clean-slate sort of colour to brighten up this basement space.

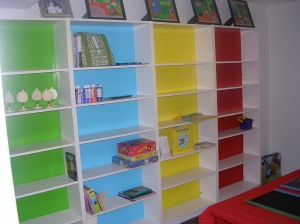
The shelving units however got the full colour treatment. Each unit was painted it’s own bright colour and I love the way this turned out.

Each shelving unit gets a different colour of paint

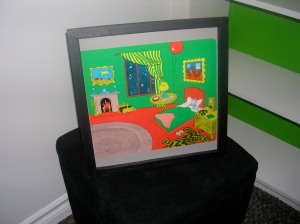
The inspiration for this room and the colouring came from the much loved kid’s story book, “Goodnight Moon”, by Margaret Wise Brown. Anyone who has read this to their child will know that sometimes kids just get addicted to a book and want to read the same one over and over every single night. And this book… well it’s a little strange. But the simple wording, repetitive phrasing and bright primary colours make it a hit with the kids. I found a large hardboard version of this book at a second hand store for $2 and 12″ x 12″ scrapbooking frames for $2 at the Dollarama. So for $10, I created wall art to be featured in this room. Right now they are located on top of the shelves, where they look great. But they might relocate to one of the white walls opposite to the shelves.

Take any kid's book, remove the pages and frame them as artwork to hang in your kid's bedroom or playroom.


This was a simple painting project with a lot of impact… I hope that you are inspired by this and create something beautiful for your little ones!

Made beautifully by Leanne 🙂

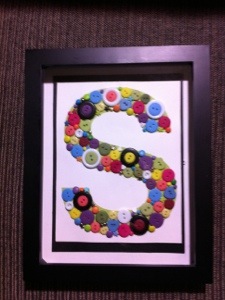
Button Monogram

Whoa, Nelly. It’s as if we haven’t been crafting and DIY’ing up a storm. We aren’t keeping it top secret from you folks either. We love to share!

This is something I did many months ago for my friend who was expecting her first little baby bundle of joy! I can’t remember the original source, but I did see it again on Pinterest a few days ago, so I’m sure you’ve all seen it before as well.

What you need:

-printed letter in the size and color you want
-shadow box
-buttons
-brads
-glue

All you have to do is:
1. Print out your letter. I did an “S” because they weren’t finding out what their baby was, and their last name starts with an “S”, which conveniently is what my name starts with, so they could easily have named the baby after me. Alas, they did not. How rude! I can’t remember what size or font I picked, because I’m organized and amazing like that. But I think it was size 130 or something. Or not. It’s really anybody’s guess. Also print the letter on card stock. Trust me, your paper needs the same support you give your double D’s. Once you add all the buttons, it gets a little front heavy.

2. Start gluing your buttons to the paper. It’s really that easy.

3. Fill in any blank spaces using brads and other embellishments you have laying around. This is why it is helpful to print the letter in a color, that way it doesn’t look like you took a bite out of it if you can’t find a tiny little bit of something to fill the gap.

4. Once it was done I cut the card stock into a rectangle that would fit onto the backing of the shadow box frame. I also painted the cardboard backing black so that it would all look put together.

5. Glue gun the card stock with the letter and button madness to the backing of the shadow box.

I believe the one I saw online used just a frame with the glass removed. I opted for the shadow box so that it would catch any of the dropped buttons in the event that they fell off. Not that I would do a shotty job like that, but I don’t want my new baby BFF to eat buttons and metal brads for snack time one day.

20121011-225831.jpg

Buttons!!!! Love them.

sd. 😻

T-Shirt Shag Rug

In my many hours of searching projects on Pinterest and Craftgawker I have come across 2 tutorials that inspired this next project….

Shag Pillow Tutorial and No Sew Shag Rug

What I’ve done is combined the 2 of these DIYs and made my own project! I love the look of the “shag” and have wanted to do a project involving “shag” for awhile now. I love the pillow tutorial but was more excited by having a shag rug. The pillow is cute – but I got to thinking about how practical it would be and it is definitely more about the look. All I could think about was lying down on the couch, falling asleep with your head on the shag pillow and waking up with a crazy amount of lines on your face! I know that probably sounds completely ridiculous but these are the things that go through my head. 😛

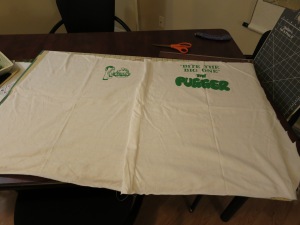
So when I came across the rug tutorial I knew it was for me! While I liked the idea of not having to sew I actually preferred to sew the rug. For a few reasons…a major one being it would be much easier to through in the washer. I worried that with the no sew idea the pieces of cotton would just fall out in the washing machine and you’d be putting it back together every time you clean it. Plus I am really loving sewing right now and learning more about the machine I got from my gramdmother. So I knew sewing it was for me! The longest part of the process is cutting the t-shirts up into strips for sewing. I honestly think sewing the strips would be faster than cutting all those tiny holes into the t-shirt base and then threading each piece through. Best part of this project – its all up-cycling! I didn’t buy anything for this project! So of course I am in love with it. At the beginning of the summer I went through all my old clothes and had a huge pile to give away. Then it dawned on me that I’d seen some projects online that up-cycles old t-shirts, so I put all my shirts aside (that weren’t too ratty) and saved them for a future project. After I had already started cutting the strips for this rug my mom was going through all my brother’s old clothes and had a huge bag of all his old t-shirts to give away. So I quickly snagged those up and have them on hand to make another rug soon! 🙂

As you can see I am very excited about this DIY! Here is my tutorial:

Materials Needed:

  • rotary cutter
  • ruler
  • quilting board
  • sewing machine
  • white thread
  • 8-10 t-shirts (depends on the size of rug you want and if you are using men’s or women’s shirts)

Here is what I started with….I later added a black t-shirt as well.

Step 1: Cut the t-shirts into strips of 1.5″ wide. Then cut the strips into lengths of anywhere from 4″-5.5″. I know it seems like a big gap in size BUT it really isn’t. This is a great project because it does not have to be perfect in any way possible. Like the blogger in the shag pillow tutorial said – “this is a very forgiving project!” I can’t remember how many shirts I cut up….9 or 10. But I didn’t end up using all the cotton. Once I started to run out of some colours I spaced out my colouring a bit more and eventually stopped when I had run out of all the pink shades.

Step 2: Then take an x-large or large mens t-shirt and cut off the arms and neck. Cut it in half. You’ll end up with 2 rectangles.

Step 3: Sew the two pieces together along one of the long edges. (I originally did this thinking I had enough strips to make a massive rug but when I started to run out of some colours I knew it wouldn’t be as big as I had hoped.)

Step 4: Next I took my ruler and drew lines 1″ apart on the t-shirt base. Some of you may not feel the need to do this, especially if you are good with a sewing machine. But since I am still learning and not very good at sewing a straight line I felt more comfortable having the lines as a guide.

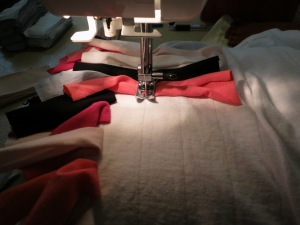
Step 5: Start sewing on your strips of cotton! There really is no rhyme or reason to this part…I didn’t follow any kind of pattern. It was completely random. I just bunched them up a bit while sewing them on.

Step 6: To start the next row, fold the strips from the first row over and start sewing again. Repeat over and over. Sew until you run out of strips or some colours…like I did.

At the end I had alot more of the bottom white t-shirt left that I could have sewn strips on. So I folded it over and sewed it to the edge of the other side. I trimmed the edges of the bottom so that none of it was showing on top and that was it!

Viola, DIY shag rug!


I also recommend buying a non-slip rug base. It’s looks like a rubber mesh thing – you can buy it at the dollar store and cut it to the size of the rug. Comes in handy, especially on slippery wood floors like I have!

It is a very simple and fun project. I really enjoyed doing it and will definitely make another one. I hope this inspires your next sewing project!

~Made beautifully by Heather~
DIY Cork Board

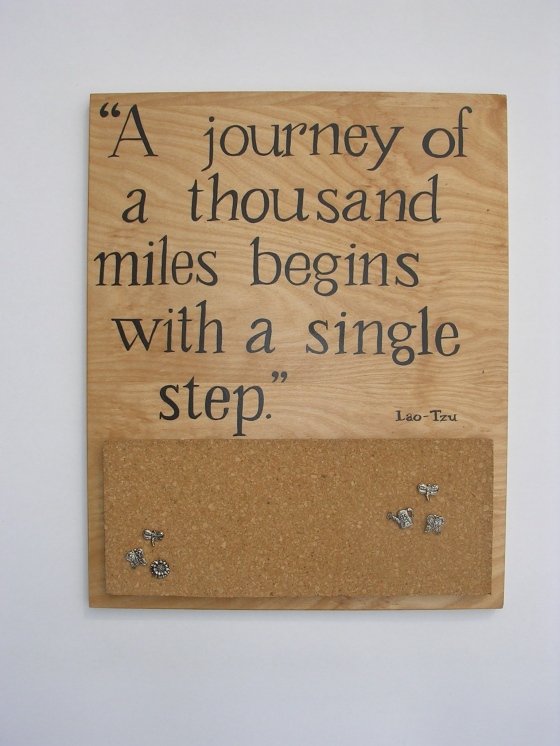
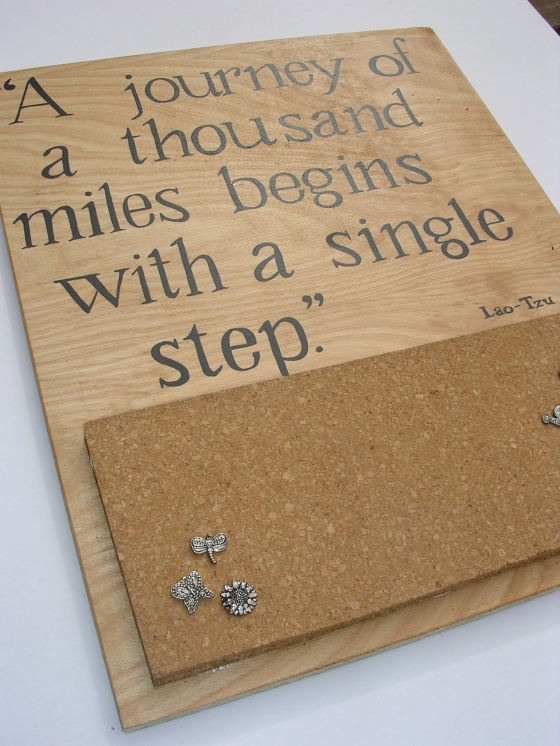
A while back I pinned a project on Pinterest of a hanging board to display race tags from various running events. My sister has recently taken up running and has already run a few 5km races. I’m so proud of her and wanted her to have a nice way to display her accomplishments.

The race tag plaque that I was looking at was very simple, but I was looking to do something pretty and include an inspirational quote.

“A journey of a thousand miles begins with a single step.” Lao-Tzu

Paint an inspirational quote and use as your visual vision board, display your accomplishments or just have a place to hang pictures.

Skill Level:

Intermediate art skills for painting fine details in the lettering. All handiwork is simple and the folks at the hardware store can help too.

Time involved:

Painting – 2 hours
Dry time – 8 hours
Assembling – 15 mins

Materials:

– wood piece for plaque/mounting piece of cork board (cut this yourself if you are able or take to your local hardware store and they can cut to size for you)
– sandpaper
– pencil
– masking tape
– craft paint
– fine paint brush
– urethane paint for dealing and protection
– foam roller
– small paint tray
– piece of cork (I got two 12″x12″ pieces for $1 at the dollar store. I only used one)
– caulking and caulking gun
– pins

How to:

1. Take your piece of wood cut to size and sand it down including the edges.
2. Choose your quote. Using a pencil, lay out the quote on your wood. I used masking tape to make straight lines to make sure my lettering was straight. I looked at a font type online and mimicked it, but free handed my lettering. It’s not perfect, but I didn’t have a stencil to use. You can of course use a stencil or vinyl lettering to put words on the wood.
3. Once you are happy with the way your quote is laid out, use craft paint and a fine paint brush to paint quote on wood.
4. Let the paint dry, then using your foam roller, tray and polyurethane, apply two light coats over the whole piece. Allow time to dry between coats.
5. When fully dry, take cork and mount to your wood using caulking to hold it in place. For mine, I wanted the cork board to be thick so I cut the cork to the size I wanted and doubled it up using the caulk to also adhere the two pieces of cork together.

This could be modified to be a larger cork board but my intention was for this to be used to display my sister’s running accomplishments. So the inspirational quote compliments this. But of course you could personalize however you wish.

Made beautifully by Leanne